Plotting
\(\newcommand{\footnotename}{footnote}\)
\(\def \LWRfootnote {1}\)
\(\newcommand {\footnote }[2][\LWRfootnote ]{{}^{\mathrm {#1}}}\)
\(\newcommand {\footnotemark }[1][\LWRfootnote ]{{}^{\mathrm {#1}}}\)
\(\let \LWRorighspace \hspace \)
\(\renewcommand {\hspace }{\ifstar \LWRorighspace \LWRorighspace }\)
\(\newcommand {\TextOrMath }[2]{#2}\)
\(\newcommand {\mathnormal }[1]{{#1}}\)
\(\newcommand \ensuremath [1]{#1}\)
\(\newcommand {\LWRframebox }[2][]{\fbox {#2}} \newcommand {\framebox }[1][]{\LWRframebox } \)
\(\newcommand {\setlength }[2]{}\)
\(\newcommand {\addtolength }[2]{}\)
\(\newcommand {\setcounter }[2]{}\)
\(\newcommand {\addtocounter }[2]{}\)
\(\newcommand {\arabic }[1]{}\)
\(\newcommand {\number }[1]{}\)
\(\newcommand {\noalign }[1]{\text {#1}\notag \\}\)
\(\newcommand {\cline }[1]{}\)
\(\newcommand {\directlua }[1]{\text {(directlua)}}\)
\(\newcommand {\luatexdirectlua }[1]{\text {(directlua)}}\)
\(\newcommand {\protect }{}\)
\(\def \LWRabsorbnumber #1 {}\)
\(\def \LWRabsorbquotenumber "#1 {}\)
\(\newcommand {\LWRabsorboption }[1][]{}\)
\(\newcommand {\LWRabsorbtwooptions }[1][]{\LWRabsorboption }\)
\(\def \mathchar {\ifnextchar "\LWRabsorbquotenumber \LWRabsorbnumber }\)
\(\def \mathcode #1={\mathchar }\)
\(\let \delcode \mathcode \)
\(\let \delimiter \mathchar \)
\(\def \oe {\unicode {x0153}}\)
\(\def \OE {\unicode {x0152}}\)
\(\def \ae {\unicode {x00E6}}\)
\(\def \AE {\unicode {x00C6}}\)
\(\def \aa {\unicode {x00E5}}\)
\(\def \AA {\unicode {x00C5}}\)
\(\def \o {\unicode {x00F8}}\)
\(\def \O {\unicode {x00D8}}\)
\(\def \l {\unicode {x0142}}\)
\(\def \L {\unicode {x0141}}\)
\(\def \ss {\unicode {x00DF}}\)
\(\def \SS {\unicode {x1E9E}}\)
\(\def \dag {\unicode {x2020}}\)
\(\def \ddag {\unicode {x2021}}\)
\(\def \P {\unicode {x00B6}}\)
\(\def \copyright {\unicode {x00A9}}\)
\(\def \pounds {\unicode {x00A3}}\)
\(\let \LWRref \ref \)
\(\renewcommand {\ref }{\ifstar \LWRref \LWRref }\)
\( \newcommand {\multicolumn }[3]{#3}\)
\(\require {textcomp}\)
\( \newcommand {\abs }[1]{\lvert #1\rvert } \)
\( \DeclareMathOperator {\sign }{sign} \)
\(\newcommand {\intertext }[1]{\text {#1}\notag \\}\)
\(\let \Hat \hat \)
\(\let \Check \check \)
\(\let \Tilde \tilde \)
\(\let \Acute \acute \)
\(\let \Grave \grave \)
\(\let \Dot \dot \)
\(\let \Ddot \ddot \)
\(\let \Breve \breve \)
\(\let \Bar \bar \)
\(\let \Vec \vec \)
\(\newcommand {\bm }[1]{\boldsymbol {#1}}\)
\(\require {physics}\)
\(\newcommand {\LWRphystrig }[2]{\ifblank {#1}{\textrm {#2}}{\textrm {#2}^{#1}}}\)
\(\renewcommand {\sin }[1][]{\LWRphystrig {#1}{sin}}\)
\(\renewcommand {\sinh }[1][]{\LWRphystrig {#1}{sinh}}\)
\(\renewcommand {\arcsin }[1][]{\LWRphystrig {#1}{arcsin}}\)
\(\renewcommand {\asin }[1][]{\LWRphystrig {#1}{asin}}\)
\(\renewcommand {\cos }[1][]{\LWRphystrig {#1}{cos}}\)
\(\renewcommand {\cosh }[1][]{\LWRphystrig {#1}{cosh}}\)
\(\renewcommand {\arccos }[1][]{\LWRphystrig {#1}{arcos}}\)
\(\renewcommand {\acos }[1][]{\LWRphystrig {#1}{acos}}\)
\(\renewcommand {\tan }[1][]{\LWRphystrig {#1}{tan}}\)
\(\renewcommand {\tanh }[1][]{\LWRphystrig {#1}{tanh}}\)
\(\renewcommand {\arctan }[1][]{\LWRphystrig {#1}{arctan}}\)
\(\renewcommand {\atan }[1][]{\LWRphystrig {#1}{atan}}\)
\(\renewcommand {\csc }[1][]{\LWRphystrig {#1}{csc}}\)
\(\renewcommand {\csch }[1][]{\LWRphystrig {#1}{csch}}\)
\(\renewcommand {\arccsc }[1][]{\LWRphystrig {#1}{arccsc}}\)
\(\renewcommand {\acsc }[1][]{\LWRphystrig {#1}{acsc}}\)
\(\renewcommand {\sec }[1][]{\LWRphystrig {#1}{sec}}\)
\(\renewcommand {\sech }[1][]{\LWRphystrig {#1}{sech}}\)
\(\renewcommand {\arcsec }[1][]{\LWRphystrig {#1}{arcsec}}\)
\(\renewcommand {\asec }[1][]{\LWRphystrig {#1}{asec}}\)
\(\renewcommand {\cot }[1][]{\LWRphystrig {#1}{cot}}\)
\(\renewcommand {\coth }[1][]{\LWRphystrig {#1}{coth}}\)
\(\renewcommand {\arccot }[1][]{\LWRphystrig {#1}{arccot}}\)
\(\renewcommand {\acot }[1][]{\LWRphystrig {#1}{acot}}\)
\(\require {cancel}\)
\(\newcommand {\underuparrow }[1]{{\underset {\uparrow }{#1}}}\)
\(\DeclareMathOperator *{\argmax }{argmax}\)
\(\DeclareMathOperator *{\argmin }{arg\,min}\)
\(\def \E [#1]{\mathbb {E}\!\left [ #1 \right ]}\)
\(\def \Var [#1]{\operatorname {Var}\!\left [ #1 \right ]}\)
\(\def \Cov [#1]{\operatorname {Cov}\!\left [ #1 \right ]}\)
\(\newcommand {\floor }[1]{\lfloor #1 \rfloor }\)
\(\newcommand {\DTFTH }{ H \brk 1{e^{j\omega }}}\)
\(\newcommand {\DTFTX }{ X\brk 1{e^{j\omega }}}\)
\(\newcommand {\DFTtr }[1]{\mathrm {DFT}\left \{#1\right \}}\)
\(\newcommand {\DTFTtr }[1]{\mathrm {DTFT}\left \{#1\right \}}\)
\(\newcommand {\DTFTtrI }[1]{\mathrm {DTFT^{-1}}\left \{#1\right \}}\)
\(\newcommand {\Ftr }[1]{ \mathcal {F}\left \{#1\right \}}\)
\(\newcommand {\FtrI }[1]{ \mathcal {F}^{-1}\left \{#1\right \}}\)
\(\newcommand {\Zover }{\overset {\mathscr Z}{\Longleftrightarrow }}\)
\(\renewcommand {\real }{\mathbb {R}}\)
\(\newcommand {\ba }{\mathbf {a}}\)
\(\newcommand {\bb }{\mathbf {b}}\)
\(\newcommand {\bc }{\mathbf {c}}\)
\(\newcommand {\bd }{\mathbf {d}}\)
\(\newcommand {\be }{\mathbf {e}}\)
\(\newcommand {\bf }{\mathbf {f}}\)
\(\newcommand {\bg }{\mathbf {g}}\)
\(\newcommand {\bh }{\mathbf {h}}\)
\(\newcommand {\bi }{\mathbf {i}}\)
\(\newcommand {\bn }{\mathbf {n}}\)
\(\newcommand {\bo }{\mathbf {o}}\)
\(\newcommand {\bp }{\mathbf {p}}\)
\(\newcommand {\bq }{\mathbf {q}}\)
\(\newcommand {\br }{\mathbf {r}}\)
\(\newcommand {\bs }{\mathbf {s}}\)
\(\newcommand {\bt }{\mathbf {t}}\)
\(\newcommand {\bu }{\mathbf {u}}\)
\(\newcommand {\bv }{\mathbf {v}}\)
\(\newcommand {\bw }{\mathbf {w}}\)
\(\newcommand {\bx }{\mathbf {x}}\)
\(\newcommand {\bxx }{\mathbf {xx}}\)
\(\newcommand {\bxy }{\mathbf {xy}}\)
\(\newcommand {\by }{\mathbf {y}}\)
\(\newcommand {\byx }{\mathbf {yx}}\)
\(\newcommand {\byy }{\mathbf {yy}}\)
\(\newcommand {\bz }{\mathbf {z}}\)
\(\newcommand {\bA }{\mathbf {A}}\)
\(\newcommand {\bB }{\mathbf {B}}\)
\(\newcommand {\bC }{\mathbf {C}}\)
\(\newcommand {\bD }{\mathbf {D}}\)
\(\newcommand {\bH }{\mathbf {H}}\)
\(\newcommand {\bI }{\mathbf {I}}\)
\(\newcommand {\bK }{\mathbf {K}}\)
\(\newcommand {\bM }{\mathbf {M}}\)
\(\newcommand {\bP }{\mathbf {P}}\)
\(\newcommand {\bQ }{\mathbf {Q}}\)
\(\newcommand {\bR }{\mathbf {R}}\)
\(\newcommand {\bS }{\mathbf {S}}\)
\(\newcommand {\bU }{\mathbf {U}}\)
\(\newcommand {\bW }{\mathbf {W}}\)
\(\newcommand {\bX }{\mathbf {X}}\)
\(\newcommand {\bY }{\mathbf {Y}}\)
\(\newcommand {\bZ }{\mathbf {Z}}\)
\(\newcommand {\balpha }{\bm {\alpha }}\)
\(\newcommand {\bth }{{\bm {\theta }}}\)
\(\newcommand {\bepsilon }{{\bm {\epsilon }}}\)
\(\newcommand {\bmu }{{\bm {\mu }}}\)
\(\newcommand {\bgamma }{{\bm {\gamma }}}\)
\(\newcommand {\bphi }{\bm {\phi }}\)
\(\newcommand {\bOne }{\mathbf {1}}\)
\(\newcommand {\bZero }{\mathbf {0}}\)
\(\newcommand {\indFunc }{\mathbb {1}}\)
\(\newcommand {\btx }{\tilde {\bx }}\)
\(\newcommand {\loss }{\mathcal {L}}\)
\(\newcommand {\score }{\mathcal {S}}\)
\(\newcommand {\SSE }{\mathrm {SSE}}\)
\(\newcommand {\SST }{\mathrm {SST}}\)
\(\newcommand {\SSR }{\mathrm {SSR}}\)
\(\newcommand {\MSE }{\mathrm {MSE}}\)
\(\newcommand {\RMSE }{\mathrm {RMSE}}\)
\(\newcommand {\toprule }[1][]{\hline }\)
\(\let \midrule \toprule \)
\(\let \bottomrule \toprule \)
\(\def \LWRbooktabscmidruleparen (#1)#2{}\)
\(\newcommand {\LWRbooktabscmidrulenoparen }[1]{}\)
\(\newcommand {\cmidrule }[1][]{\ifnextchar (\LWRbooktabscmidruleparen \LWRbooktabscmidrulenoparen }\)
\(\newcommand {\morecmidrules }{}\)
\(\newcommand {\specialrule }[3]{\hline }\)
\(\newcommand {\addlinespace }[1][]{}\)
\(\newcommand {\LWRsubmultirow }[2][]{#2}\)
\(\newcommand {\LWRmultirow }[2][]{\LWRsubmultirow }\)
\(\newcommand {\multirow }[2][]{\LWRmultirow }\)
\(\newcommand {\mrowcell }{}\)
\(\newcommand {\mcolrowcell }{}\)
\(\newcommand {\STneed }[1]{}\)
\(\newcommand {\tcbset }[1]{}\)
\(\newcommand {\tcbsetforeverylayer }[1]{}\)
\(\newcommand {\tcbox }[2][]{\boxed {\text {#2}}}\)
\(\newcommand {\tcboxfit }[2][]{\boxed {#2}}\)
\(\newcommand {\tcblower }{}\)
\(\newcommand {\tcbline }{}\)
\(\newcommand {\tcbtitle }{}\)
\(\newcommand {\tcbsubtitle [2][]{\mathrm {#2}}}\)
\(\newcommand {\tcboxmath }[2][]{\boxed {#2}}\)
\(\newcommand {\tcbhighmath }[2][]{\boxed {#2}}\)
\(\require {colortbl}\)
\(\let \LWRorigcolumncolor \columncolor \)
\(\renewcommand {\columncolor }[2][named]{\LWRorigcolumncolor [#1]{#2}\LWRabsorbtwooptions }\)
\(\let \LWRorigrowcolor \rowcolor \)
\(\renewcommand {\rowcolor }[2][named]{\LWRorigrowcolor [#1]{#2}\LWRabsorbtwooptions }\)
\(\let \LWRorigcellcolor \cellcolor \)
\(\renewcommand {\cellcolor }[2][named]{\LWRorigcellcolor [#1]{#2}\LWRabsorbtwooptions }\)
\(\newcommand {\tothe }[1]{^{#1}}\)
\(\newcommand {\raiseto }[2]{{#2}^{#1}}\)
\(\newcommand {\LWRsiunitxEND }{}\)
\(\def \LWRsiunitxang #1;#2;#3;#4\LWRsiunitxEND {\ifblank {#1}{}{\num {#1}\degree }\ifblank {#2}{}{\num {#2}^{\unicode {x2032}}}\ifblank {#3}{}{\num {#3}^{\unicode {x2033}}}}\)
\(\newcommand {\ang }[2][]{\LWRsiunitxang #2;;;\LWRsiunitxEND }\)
\(\def \LWRsiunitxdistribunit {}\)
\(\newcommand {\LWRsiunitxENDTWO }{}\)
\(\def \LWRsiunitxprintdecimalsubtwo #1,#2,#3\LWRsiunitxENDTWO {\ifblank {#1}{0}{\mathrm {#1}}\ifblank {#2}{}{{\LWRsiunitxdecimal }\mathrm {#2}}}\)
\(\def \LWRsiunitxprintdecimalsub #1.#2.#3\LWRsiunitxEND {\LWRsiunitxprintdecimalsubtwo #1,,\LWRsiunitxENDTWO \ifblank {#2}{}{{\LWRsiunitxdecimal }\LWRsiunitxprintdecimalsubtwo
#2,,\LWRsiunitxENDTWO }}\)
\(\newcommand {\LWRsiunitxprintdecimal }[1]{\LWRsiunitxprintdecimalsub #1...\LWRsiunitxEND }\)
\(\def \LWRsiunitxnumplus #1+#2+#3\LWRsiunitxEND {\ifblank {#2}{\LWRsiunitxprintdecimal {#1}}{\ifblank {#1}{\LWRsiunitxprintdecimal {#2}}{\LWRsiunitxprintdecimal {#1}\unicode
{x02B}\LWRsiunitxprintdecimal {#2}}}\LWRsiunitxdistribunit }\)
\(\def \LWRsiunitxnumminus #1-#2-#3\LWRsiunitxEND {\ifblank {#2}{\LWRsiunitxnumplus #1+++\LWRsiunitxEND }{\ifblank {#1}{}{\LWRsiunitxprintdecimal {#1}}\unicode {x02212}\LWRsiunitxprintdecimal
{#2}\LWRsiunitxdistribunit }}\)
\(\def \LWRsiunitxnumpmmacro #1\pm #2\pm #3\LWRsiunitxEND {\ifblank {#2}{\LWRsiunitxnumminus #1---\LWRsiunitxEND }{\LWRsiunitxprintdecimal {#1}\unicode {x0B1}\LWRsiunitxprintdecimal
{#2}\LWRsiunitxdistribunit }}\)
\(\def \LWRsiunitxnumpm #1+-#2+-#3\LWRsiunitxEND {\ifblank {#2}{\LWRsiunitxnumpmmacro #1\pm \pm \pm \LWRsiunitxEND }{\LWRsiunitxprintdecimal {#1}\unicode {x0B1}\LWRsiunitxprintdecimal
{#2}\LWRsiunitxdistribunit }}\)
\(\newcommand {\LWRsiunitxnumscientific }[2]{\ifblank {#1}{}{\ifstrequal {#1}{-}{-}{\LWRsiunitxprintdecimal {#1}\times }}10^{\LWRsiunitxprintdecimal {#2}}\LWRsiunitxdistribunit }\)
\(\def \LWRsiunitxnumD #1D#2D#3\LWRsiunitxEND {\ifblank {#2}{\LWRsiunitxnumpm #1+-+-\LWRsiunitxEND }{\mathrm {\LWRsiunitxnumscientific {#1}{#2}}}}\)
\(\def \LWRsiunitxnumd #1d#2d#3\LWRsiunitxEND {\ifblank {#2}{\LWRsiunitxnumD #1DDD\LWRsiunitxEND }{\mathrm {\LWRsiunitxnumscientific {#1}{#2}}}}\)
\(\def \LWRsiunitxnumE #1E#2E#3\LWRsiunitxEND {\ifblank {#2}{\LWRsiunitxnumd #1ddd\LWRsiunitxEND }{\mathrm {\LWRsiunitxnumscientific {#1}{#2}}}}\)
\(\def \LWRsiunitxnume #1e#2e#3\LWRsiunitxEND {\ifblank {#2}{\LWRsiunitxnumE #1EEE\LWRsiunitxEND }{\mathrm {\LWRsiunitxnumscientific {#1}{#2}}}}\)
\(\def \LWRsiunitxnumx #1x#2x#3x#4\LWRsiunitxEND {\ifblank {#2}{\LWRsiunitxnume #1eee\LWRsiunitxEND }{\ifblank {#3}{\LWRsiunitxnume #1eee\LWRsiunitxEND \times \LWRsiunitxnume
#2eee\LWRsiunitxEND }{\LWRsiunitxnume #1eee\LWRsiunitxEND \times \LWRsiunitxnume #2eee\LWRsiunitxEND \times \LWRsiunitxnume #3eee\LWRsiunitxEND }}}\)
\(\newcommand {\num }[2][]{\LWRsiunitxnumx #2xxxxx\LWRsiunitxEND }\)
\(\newcommand {\si }[2][]{\mathrm {\gsubstitute {#2}{~}{\,}}}\)
\(\def \LWRsiunitxSIopt #1[#2]#3{\def \LWRsiunitxdistribunit {\,\si {#3}}{#2}\num {#1}\def \LWRsiunitxdistribunit {}}\)
\(\newcommand {\LWRsiunitxSI }[2]{\def \LWRsiunitxdistribunit {\,\si {#2}}\num {#1}\def \LWRsiunitxdistribunit {}}\)
\(\newcommand {\SI }[2][]{\ifnextchar [{\LWRsiunitxSIopt {#2}}{\LWRsiunitxSI {#2}}}\)
\(\newcommand {\numlist }[2][]{\text {#2}}\)
\(\newcommand {\numrange }[3][]{\num {#2}\ \LWRsiunitxrangephrase \ \num {#3}}\)
\(\newcommand {\SIlist }[3][]{\text {#2}\,\si {#3}}\)
\(\newcommand {\SIrange }[4][]{\num {#2}\,#4\ \LWRsiunitxrangephrase \ \num {#3}\,#4}\)
\(\newcommand {\tablenum }[2][]{\mathrm {#2}}\)
\(\newcommand {\ampere }{\mathrm {A}}\)
\(\newcommand {\candela }{\mathrm {cd}}\)
\(\newcommand {\kelvin }{\mathrm {K}}\)
\(\newcommand {\kilogram }{\mathrm {kg}}\)
\(\newcommand {\metre }{\mathrm {m}}\)
\(\newcommand {\mole }{\mathrm {mol}}\)
\(\newcommand {\second }{\mathrm {s}}\)
\(\newcommand {\becquerel }{\mathrm {Bq}}\)
\(\newcommand {\degreeCelsius }{\unicode {x2103}}\)
\(\newcommand {\coulomb }{\mathrm {C}}\)
\(\newcommand {\farad }{\mathrm {F}}\)
\(\newcommand {\gray }{\mathrm {Gy}}\)
\(\newcommand {\hertz }{\mathrm {Hz}}\)
\(\newcommand {\henry }{\mathrm {H}}\)
\(\newcommand {\joule }{\mathrm {J}}\)
\(\newcommand {\katal }{\mathrm {kat}}\)
\(\newcommand {\lumen }{\mathrm {lm}}\)
\(\newcommand {\lux }{\mathrm {lx}}\)
\(\newcommand {\newton }{\mathrm {N}}\)
\(\newcommand {\ohm }{\mathrm {\Omega }}\)
\(\newcommand {\pascal }{\mathrm {Pa}}\)
\(\newcommand {\radian }{\mathrm {rad}}\)
\(\newcommand {\siemens }{\mathrm {S}}\)
\(\newcommand {\sievert }{\mathrm {Sv}}\)
\(\newcommand {\steradian }{\mathrm {sr}}\)
\(\newcommand {\tesla }{\mathrm {T}}\)
\(\newcommand {\volt }{\mathrm {V}}\)
\(\newcommand {\watt }{\mathrm {W}}\)
\(\newcommand {\weber }{\mathrm {Wb}}\)
\(\newcommand {\day }{\mathrm {d}}\)
\(\newcommand {\degree }{\mathrm {^\circ }}\)
\(\newcommand {\hectare }{\mathrm {ha}}\)
\(\newcommand {\hour }{\mathrm {h}}\)
\(\newcommand {\litre }{\mathrm {l}}\)
\(\newcommand {\liter }{\mathrm {L}}\)
\(\newcommand {\arcminute }{^\prime }\)
\(\newcommand {\minute }{\mathrm {min}}\)
\(\newcommand {\arcsecond }{^{\prime \prime }}\)
\(\newcommand {\tonne }{\mathrm {t}}\)
\(\newcommand {\astronomicalunit }{au}\)
\(\newcommand {\atomicmassunit }{u}\)
\(\newcommand {\bohr }{\mathit {a}_0}\)
\(\newcommand {\clight }{\mathit {c}_0}\)
\(\newcommand {\dalton }{\mathrm {D}_\mathrm {a}}\)
\(\newcommand {\electronmass }{\mathit {m}_{\mathrm {e}}}\)
\(\newcommand {\electronvolt }{\mathrm {eV}}\)
\(\newcommand {\elementarycharge }{\mathit {e}}\)
\(\newcommand {\hartree }{\mathit {E}_{\mathrm {h}}}\)
\(\newcommand {\planckbar }{\mathit {\unicode {x210F}}}\)
\(\newcommand {\angstrom }{\mathrm {\unicode {x212B}}}\)
\(\let \LWRorigbar \bar \)
\(\newcommand {\bar }{\mathrm {bar}}\)
\(\newcommand {\barn }{\mathrm {b}}\)
\(\newcommand {\bel }{\mathrm {B}}\)
\(\newcommand {\decibel }{\mathrm {dB}}\)
\(\newcommand {\knot }{\mathrm {kn}}\)
\(\newcommand {\mmHg }{\mathrm {mmHg}}\)
\(\newcommand {\nauticalmile }{\mathrm {M}}\)
\(\newcommand {\neper }{\mathrm {Np}}\)
\(\newcommand {\yocto }{\mathrm {y}}\)
\(\newcommand {\zepto }{\mathrm {z}}\)
\(\newcommand {\atto }{\mathrm {a}}\)
\(\newcommand {\femto }{\mathrm {f}}\)
\(\newcommand {\pico }{\mathrm {p}}\)
\(\newcommand {\nano }{\mathrm {n}}\)
\(\newcommand {\micro }{\mathrm {\unicode {x00B5}}}\)
\(\newcommand {\milli }{\mathrm {m}}\)
\(\newcommand {\centi }{\mathrm {c}}\)
\(\newcommand {\deci }{\mathrm {d}}\)
\(\newcommand {\deca }{\mathrm {da}}\)
\(\newcommand {\hecto }{\mathrm {h}}\)
\(\newcommand {\kilo }{\mathrm {k}}\)
\(\newcommand {\mega }{\mathrm {M}}\)
\(\newcommand {\giga }{\mathrm {G}}\)
\(\newcommand {\tera }{\mathrm {T}}\)
\(\newcommand {\peta }{\mathrm {P}}\)
\(\newcommand {\exa }{\mathrm {E}}\)
\(\newcommand {\zetta }{\mathrm {Z}}\)
\(\newcommand {\yotta }{\mathrm {Y}}\)
\(\newcommand {\percent }{\mathrm {\%}}\)
\(\newcommand {\meter }{\mathrm {m}}\)
\(\newcommand {\metre }{\mathrm {m}}\)
\(\newcommand {\gram }{\mathrm {g}}\)
\(\newcommand {\kg }{\kilo \gram }\)
\(\newcommand {\of }[1]{_{\mathrm {#1}}}\)
\(\newcommand {\squared }{^2}\)
\(\newcommand {\square }[1]{\mathrm {#1}^2}\)
\(\newcommand {\cubed }{^3}\)
\(\newcommand {\cubic }[1]{\mathrm {#1}^3}\)
\(\newcommand {\per }{\,\mathrm {/}}\)
\(\newcommand {\celsius }{\unicode {x2103}}\)
\(\newcommand {\fg }{\femto \gram }\)
\(\newcommand {\pg }{\pico \gram }\)
\(\newcommand {\ng }{\nano \gram }\)
\(\newcommand {\ug }{\micro \gram }\)
\(\newcommand {\mg }{\milli \gram }\)
\(\newcommand {\g }{\gram }\)
\(\newcommand {\kg }{\kilo \gram }\)
\(\newcommand {\amu }{\mathrm {u}}\)
\(\newcommand {\pm }{\pico \metre }\)
\(\newcommand {\nm }{\nano \metre }\)
\(\newcommand {\um }{\micro \metre }\)
\(\newcommand {\mm }{\milli \metre }\)
\(\newcommand {\cm }{\centi \metre }\)
\(\newcommand {\dm }{\deci \metre }\)
\(\newcommand {\m }{\metre }\)
\(\newcommand {\km }{\kilo \metre }\)
\(\newcommand {\as }{\atto \second }\)
\(\newcommand {\fs }{\femto \second }\)
\(\newcommand {\ps }{\pico \second }\)
\(\newcommand {\ns }{\nano \second }\)
\(\newcommand {\us }{\micro \second }\)
\(\newcommand {\ms }{\milli \second }\)
\(\newcommand {\s }{\second }\)
\(\newcommand {\fmol }{\femto \mol }\)
\(\newcommand {\pmol }{\pico \mol }\)
\(\newcommand {\nmol }{\nano \mol }\)
\(\newcommand {\umol }{\micro \mol }\)
\(\newcommand {\mmol }{\milli \mol }\)
\(\newcommand {\mol }{\mol }\)
\(\newcommand {\kmol }{\kilo \mol }\)
\(\newcommand {\pA }{\pico \ampere }\)
\(\newcommand {\nA }{\nano \ampere }\)
\(\newcommand {\uA }{\micro \ampere }\)
\(\newcommand {\mA }{\milli \ampere }\)
\(\newcommand {\A }{\ampere }\)
\(\newcommand {\kA }{\kilo \ampere }\)
\(\newcommand {\ul }{\micro \litre }\)
\(\newcommand {\ml }{\milli \litre }\)
\(\newcommand {\l }{\litre }\)
\(\newcommand {\hl }{\hecto \litre }\)
\(\newcommand {\uL }{\micro \liter }\)
\(\newcommand {\mL }{\milli \liter }\)
\(\newcommand {\L }{\liter }\)
\(\newcommand {\hL }{\hecto \liter }\)
\(\newcommand {\mHz }{\milli \hertz }\)
\(\newcommand {\Hz }{\hertz }\)
\(\newcommand {\kHz }{\kilo \hertz }\)
\(\newcommand {\MHz }{\mega \hertz }\)
\(\newcommand {\GHz }{\giga \hertz }\)
\(\newcommand {\THz }{\tera \hertz }\)
\(\newcommand {\mN }{\milli \newton }\)
\(\newcommand {\N }{\newton }\)
\(\newcommand {\kN }{\kilo \newton }\)
\(\newcommand {\MN }{\mega \newton }\)
\(\newcommand {\Pa }{\pascal }\)
\(\newcommand {\kPa }{\kilo \pascal }\)
\(\newcommand {\MPa }{\mega \pascal }\)
\(\newcommand {\GPa }{\giga \pascal }\)
\(\newcommand {\mohm }{\milli \ohm }\)
\(\newcommand {\kohm }{\kilo \ohm }\)
\(\newcommand {\Mohm }{\mega \ohm }\)
\(\newcommand {\pV }{\pico \volt }\)
\(\newcommand {\nV }{\nano \volt }\)
\(\newcommand {\uV }{\micro \volt }\)
\(\newcommand {\mV }{\milli \volt }\)
\(\newcommand {\V }{\volt }\)
\(\newcommand {\kV }{\kilo \volt }\)
\(\newcommand {\W }{\watt }\)
\(\newcommand {\uW }{\micro \watt }\)
\(\newcommand {\mW }{\milli \watt }\)
\(\newcommand {\kW }{\kilo \watt }\)
\(\newcommand {\MW }{\mega \watt }\)
\(\newcommand {\GW }{\giga \watt }\)
\(\newcommand {\J }{\joule }\)
\(\newcommand {\uJ }{\micro \joule }\)
\(\newcommand {\mJ }{\milli \joule }\)
\(\newcommand {\kJ }{\kilo \joule }\)
\(\newcommand {\eV }{\electronvolt }\)
\(\newcommand {\meV }{\milli \electronvolt }\)
\(\newcommand {\keV }{\kilo \electronvolt }\)
\(\newcommand {\MeV }{\mega \electronvolt }\)
\(\newcommand {\GeV }{\giga \electronvolt }\)
\(\newcommand {\TeV }{\tera \electronvolt }\)
\(\newcommand {\kWh }{\kilo \watt \hour }\)
\(\newcommand {\F }{\farad }\)
\(\newcommand {\fF }{\femto \farad }\)
\(\newcommand {\pF }{\pico \farad }\)
\(\newcommand {\K }{\mathrm {K}}\)
\(\newcommand {\dB }{\mathrm {dB}}\)
\(\newcommand {\kibi }{\mathrm {Ki}}\)
\(\newcommand {\mebi }{\mathrm {Mi}}\)
\(\newcommand {\gibi }{\mathrm {Gi}}\)
\(\newcommand {\tebi }{\mathrm {Ti}}\)
\(\newcommand {\pebi }{\mathrm {Pi}}\)
\(\newcommand {\exbi }{\mathrm {Ei}}\)
\(\newcommand {\zebi }{\mathrm {Zi}}\)
\(\newcommand {\yobi }{\mathrm {Yi}}\)
\(\let \unit \si \)
\(\let \qty \SI \)
\(\let \qtylist \SIlist \)
\(\let \qtyrange \SIrange \)
\(\let \numproduct \num \)
\(\let \qtyproduct \SI \)
\(\let \complexnum \num \)
\(\newcommand {\complexqty }[3][]{(\complexnum {#2})\si {#3}}\)
\(\renewcommand {\pm }{\mathbin {\unicode {x00B1}}}\)
\(\def \LWRsiunitxrangephrase {\TextOrMath { }{\ }\protect \mbox {to}\TextOrMath { }{\ }}\)
\(\def \LWRsiunitxdecimal {.}\)
8 Choosing a Font
A figure’s text is document text. It is read on the same page, at the same distance, as the body around it.
• Text sized at the width the figure will actually be printed at.
• One font (at least family) throughout the figure, text and math.
8.1 Figure size sets the text size
Point size is fixed in the script while the figure is scaled to fit the page, so the two are tied by one relation. A figure authored at width \(w_a\) and placed at width \(w_p\) has every glyph scaled by \(s = w_p / w_a\), and the size
the reader actually gets is
\(\seteqnumber{0}{8.}{0}\)
\begin{equation}
p_{\mathrm {page}} = s\,p_{\mathrm {script}}. \label {eq-plot-fontscale}
\end{equation}
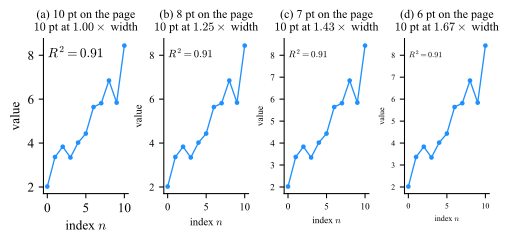
Authored at \(15\) cm and placed at \(8.8\) cm gives \(s = 0.59\), so a \(10\) pt tick label arrives at \(5.9\) pt. Nothing in the script announces this, and nothing in the figure looks wrong until it is
printed.
The reliable fix is \(s = 1\): set the figure width to the width it will occupy and place it without a width= override, so a point in the script is a point on the page. Fig. 8.1 is drawn that way, which is what lets each of its panels be read twice over.
Figure 8.1: Type in a figure, at the size it is printed at. (a) to (d) One panel drawn four times, its labels at \(10\), \(8\), \(7\) and \(6\) pt. Each panel is also the second reading of its own subtitle: \(6\) pt on
the page is what a \(10\) pt setting delivers once the figure has been authored at \(1.67\) times its final width.
8.2 The three kinds of face
Three distinctions cover what a plotting library will offer, and only the last of them is a matter of mechanism rather than appearance.
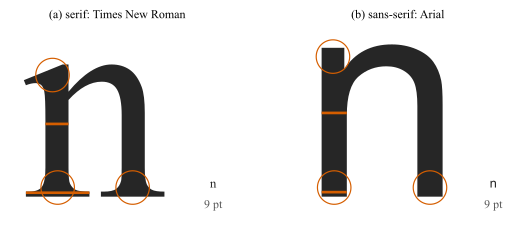
• Serif : small terminal strokes on the letters, the feet and heads magnified in Fig. 8.2 . It matches most printed body text,
which makes it the default for a figure that will sit inside a document.
• Sans-serif : no terminal strokes, and a more even stroke weight. It survives small size, low resolution and a poor projector better, for the direct reason that the first detail to
disappear in a serif face is the serif.
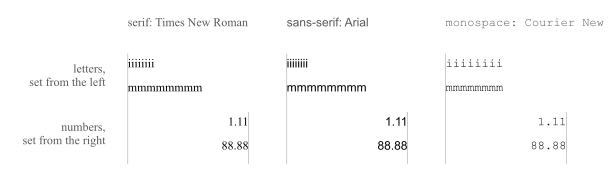
• Monospace : every character claims the same width, so an i occupies as much room as an m . That is the entire difference, and Fig. 8.3 is it: eight i and eight m end at the same place in the monospace column and nowhere else.
The first two of the three differ in one detail, and it is a small one. At the size a label is actually read, a serif is a fraction of a millimeter of ink at the end of a stroke, which is why it takes a magnification to see what is being talked
about, and why it is the first thing lost when the figure is shrunk or projected.
Figure 8.2: The letter n at \(200\) pt, a magnification of \(22\) over the \(9\) pt it is read at, drawn in the two text faces at one scale, with the same letter at reading size beside it. The bars measure
the left stem where it is a stem and where it meets the baseline: in Times New Roman the foot is \(2.8\) times the stem, and in Arial the foot is the stem, \(1.00\). The rings mark the head of that stem and both feet of the letter,
each placed where the ink was found rather than by hand; in (b) they enclose plain cut ends.
Figure 8.3: The same eight letters and the same two numbers in the three kinds of face, set against a left guide and a right guide. The \(\texttt {i}\) and \(\texttt {m}\) rows end together only in the monospace column,
where both letters claim \(6.00\) pt; in the other two an \(\texttt {i}\) claims \(0.36\) and \(0.27\) of an \(\texttt {m}\). The number rows align in all three, because digits are drawn to one width in text faces as well.
Monospace is worth reaching for when the text is something that was literally typed, since it preserves indentation and lets a reader count characters: code, file names, hex color codes such as the #1F77B4 of
Sec. 5.1 .
Monospace is for programers
Monospace is commonly used for programing environments. Modern font families features a "texture healing" technique that softens the wide gaps usually found in fixed-width text, improving code readability while keeping a strict
vertical grid.
Between serif and sans there is no reliable difference in reading speed to appeal to. That choice is settled by the medium and by the document the figure will sit in, not by preference.
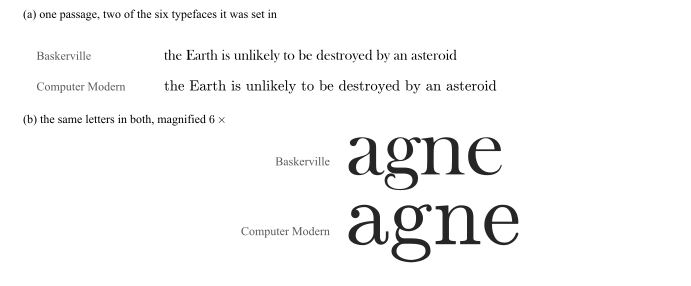
That is a statement about reading speed, and it is not a statement about everything else. Fig. 8.4 is the case that makes the difference.
Figure 8.4: Two of the six typefaces of the experiment described below, the one that came first and the one that came second. (a) The same passage in both, at \(11\) pt, which is how the readers met it. (b) The same
four letters magnified \(6\) times. The two faces differ far below the \(2\) mm at which detail stops being resolved.
Two faces that look alike, and did not perform alike
In 2012 a newspaper ran a quiz that was really a typography experiment.5
Agreement ran about \(1.5\) percentage points higher in Baskerville than in the rest, significant at \(p < 0.01\) on that sample. Computer Modern was the runner-up and Comic Sans came last. The two at the top are the
pair in Fig. 8.4 , and that is the finding worth carrying: they are two serif book faces that an ordinary reader cannot name, cannot tell apart in running text, and was
not asked about. Whatever produced the difference, it was not anybody noticing the typeface.
What may not be concluded is that a typeface can be chosen for trust. It is one experiment, on one passage, with an effect of a percentage point and a half: large enough to measure at that sample size, and far too small to design
around. What it does establish is that the face is never neutral, which is a reason to set it deliberately rather than to inherit it from the library.